
Welcome to Sushi4Craig.com
Welcome to a re-launch of my blog/aggregation site. I'm a full-time technology officer at my company, part-time Amateur Radio operator, Freemason, Travel Enthusiast, and dabbler in woodworking.
A Traveling Trophy
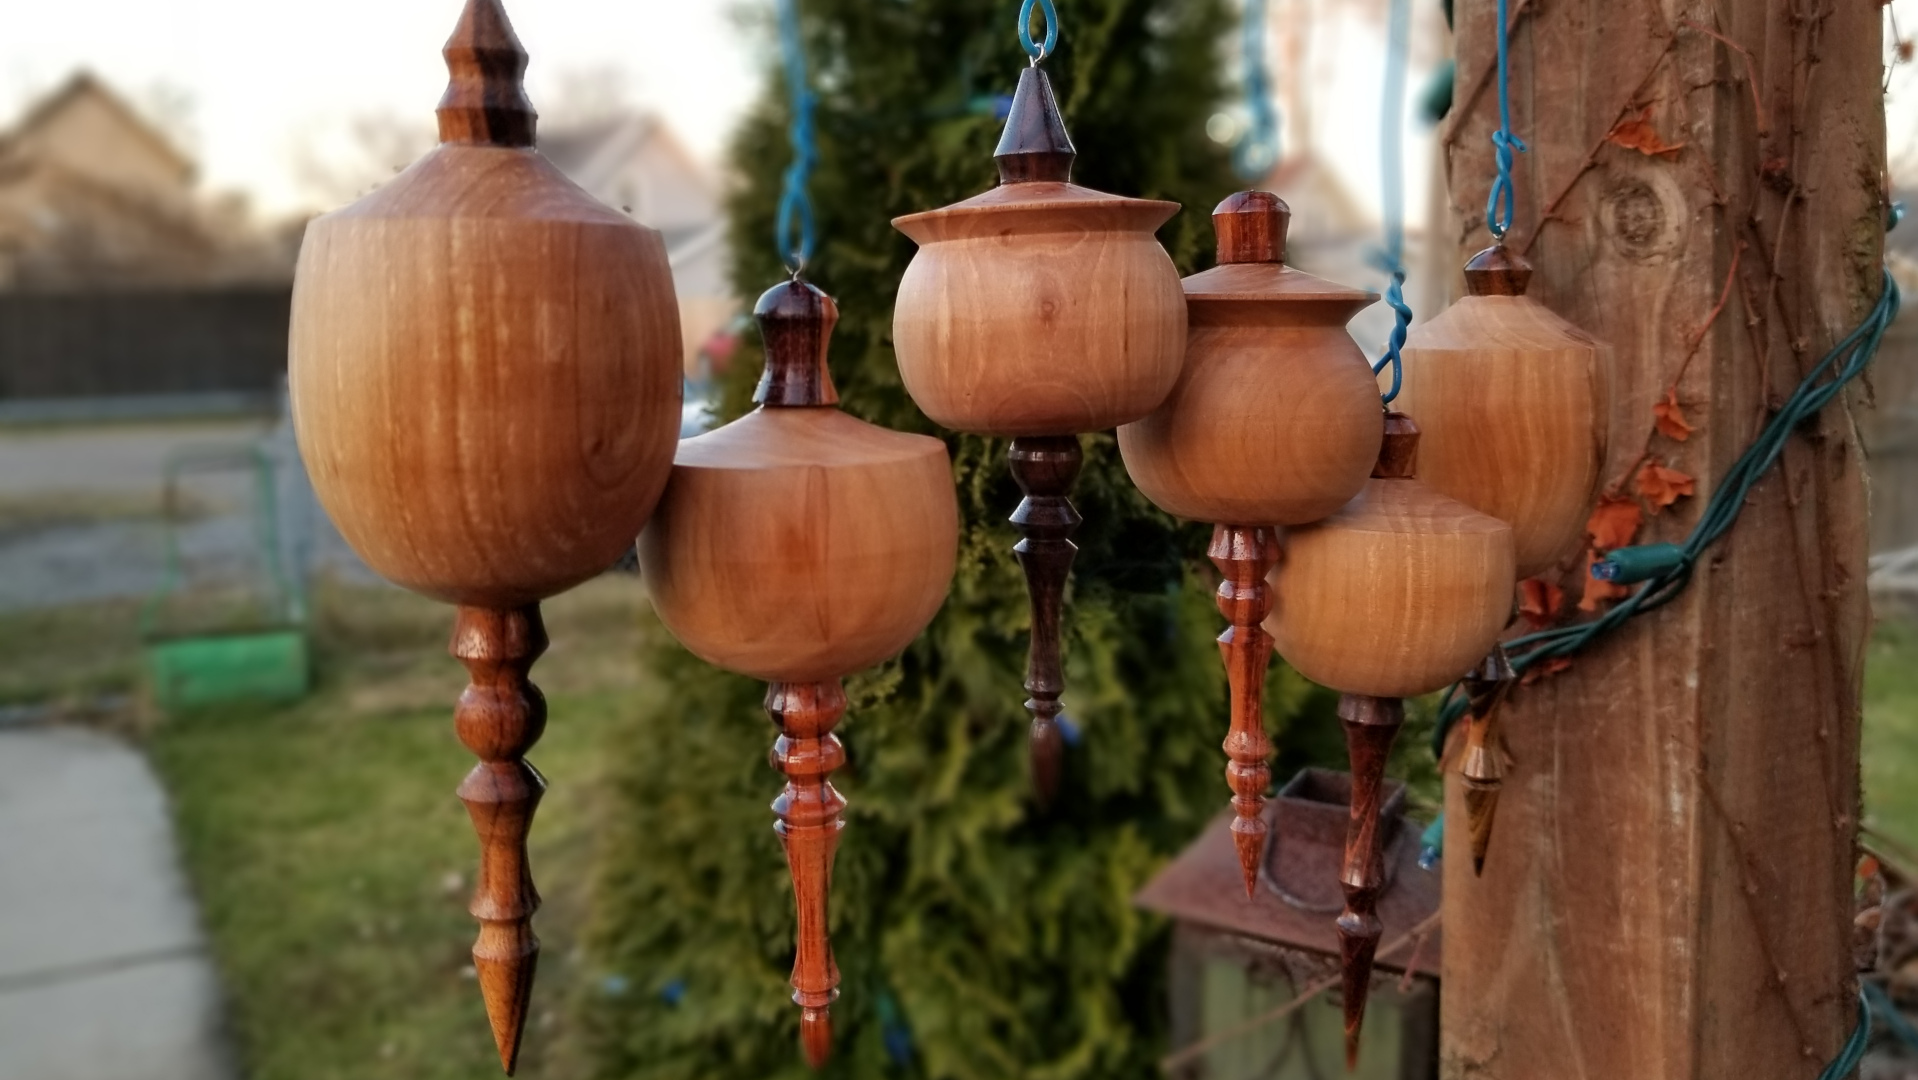
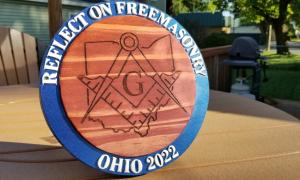 I was given the opportunity by the Fifth Masonic District of Ohio to craft a replica of the Grand Master's Pin to be used as a "Traveling" Trophy for the 2022 Masonic Inspection season. To the uninitiated, Masonic Lodges need to demonstrate proficiency for conducting their lodge as well as exemplifying degree work. This usually happens in the first half of the year and is what we refer to as Inspection Season. During this time, it is a popular competition to see how many lodge members can get together to travel to another lodge and observe their degree work. The lodge with the most "traveling" brothers would get this plaque to hang in their lodge. A fellow brother in the 5th district has always been tasked with making a different one every year based on that Grand Master's Pin. That brother sadly passed away last year so I offered to continue the tradition. Our new Grand Master of Masons in Ohio has set his slogan as "Reflect on Freemasonry". I crafted two of these, one for its intended purpose, and one as a gift. I decided to use a 4-degree slant cut on my Delta scrollsaw to give a relief set for the lettering and laser-etched the main centerpiece logo. The finish is enamel paint on the letters and outer ring, with a light cherry stain on the center with semi-gloss polyurethane. One is a piece of aspen, the other a birch plywood. Both are roughly 12 inches in diameter. Altogether, about 12 hours of construction time.
Tags
Framed for success
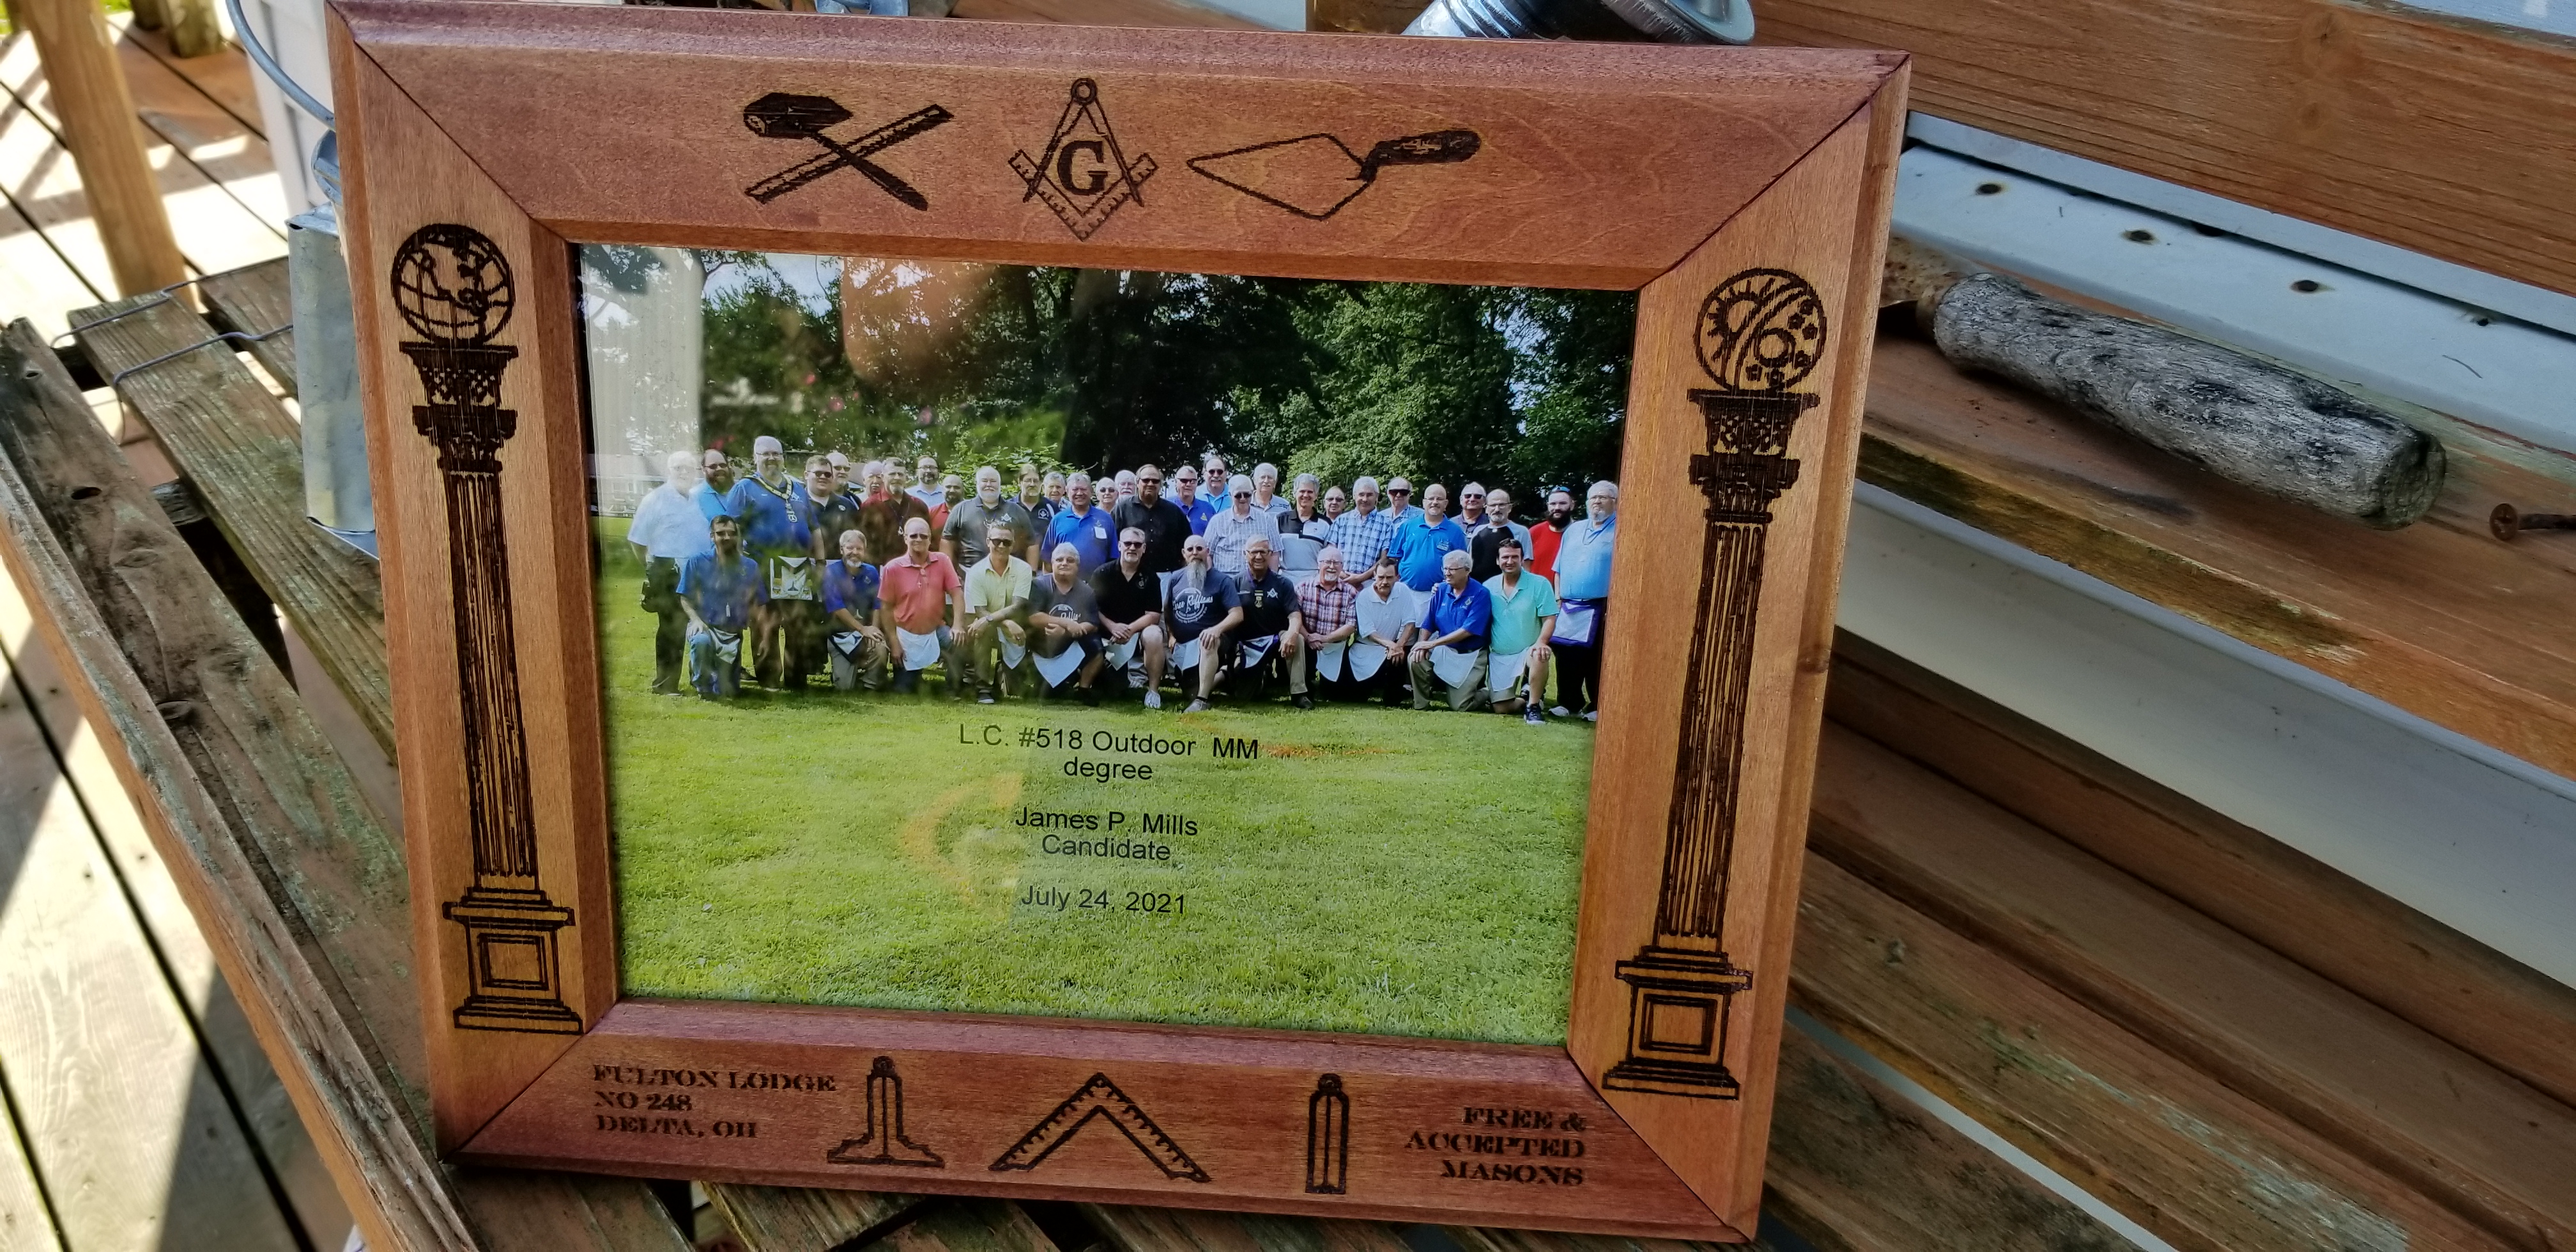 Here is a quick woodworking project for a brother in our lodge. He received his MM degree at a special outdoor ceremony and we wanted a frame that would reflect the three degrees. The wood is simple aspen which was routed for the profile and then run through the Laser CNC to imprint the masonic artwork. A quick finish with stain and polyurethane to complete the look.
Tags
Battery Box Build
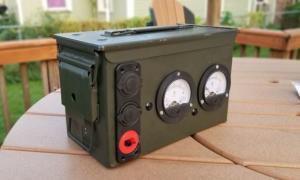 The following is a battery box build I wanted for field operations. Overall dimensions at 12in x 6in x 7in and the whole unit is about 12lbs. I started with a fairly good-sized ammo box I acquired at a hamfest I cannot even remember how long ago. My first attempt was with a salvaged lead-acid UPS battery, but I found it too heavy to be practical, and the cells were not in great shape. I did some reading on Lithium Iron Phosphate and decided to give that a try, especially since a 20aH was just about the right dimensions. The very first iteration was with the triple bulkhead mount outlets similar to Powerwerx, but definitely a Chinese knock-off. When I bought that panel a few years ago, it did not have an Anderson PowerPole module, but I was able to locate a 3D Print STL file and printed my own. Since that time, I see Powerwerx does carry them now. I added a power button for the USB power module since it was in an "always-on" mode. I found a step-index drill bit sourced from Harbor Freight was sufficient to bore through the steel casing. The next iteration was to put in a voltmeter and ammeter. The units I ordered from Amazon were larger than I anticipated, so I had to go back and get a 70mm carbide hole saw (so yeah, I have one of those now). I added a powerpole "bus" to eliminate the wire nuts and electrical tape, making it feel a bit more solid. I padded the battery with some foam packing material we get tons of at work every time we get a new computer in and secured the internal components with urethane glue.
Build List:
| 70mm Carbide Hole Saw | $17 |
| 75mV DC Shunt for ammeter | $7 |
| DC20A Ammeter | $12 |
| DC15V Voltmeter | $12 |
| 6 Position PowerPole Block | $33 |
| Lithium Iron Phosphate Charger | $32 |
| LifePo4 20aH Battery | $99 |
| 12V LED Blue Push Button (6 pack) | $16 |
| 12V 3 port accessory Module | $18 |
| PowerPole Bulkhead | $25 |
| Ammo Box (hamfest find) | $20 |
| Total | $291 |
Tags
Potting Bench Rehab
 The results of resurfacing Jens 15-year-old potting bench. It was cheap, to begin with, and just succumbed to the northwest Ohio weather despite being restained and sealed every other year. Now that lumber prices have started to normalize, I took some time this week to resurface it with fresh 11/16 cedar planking.
Tags
EA Lecture Plaque
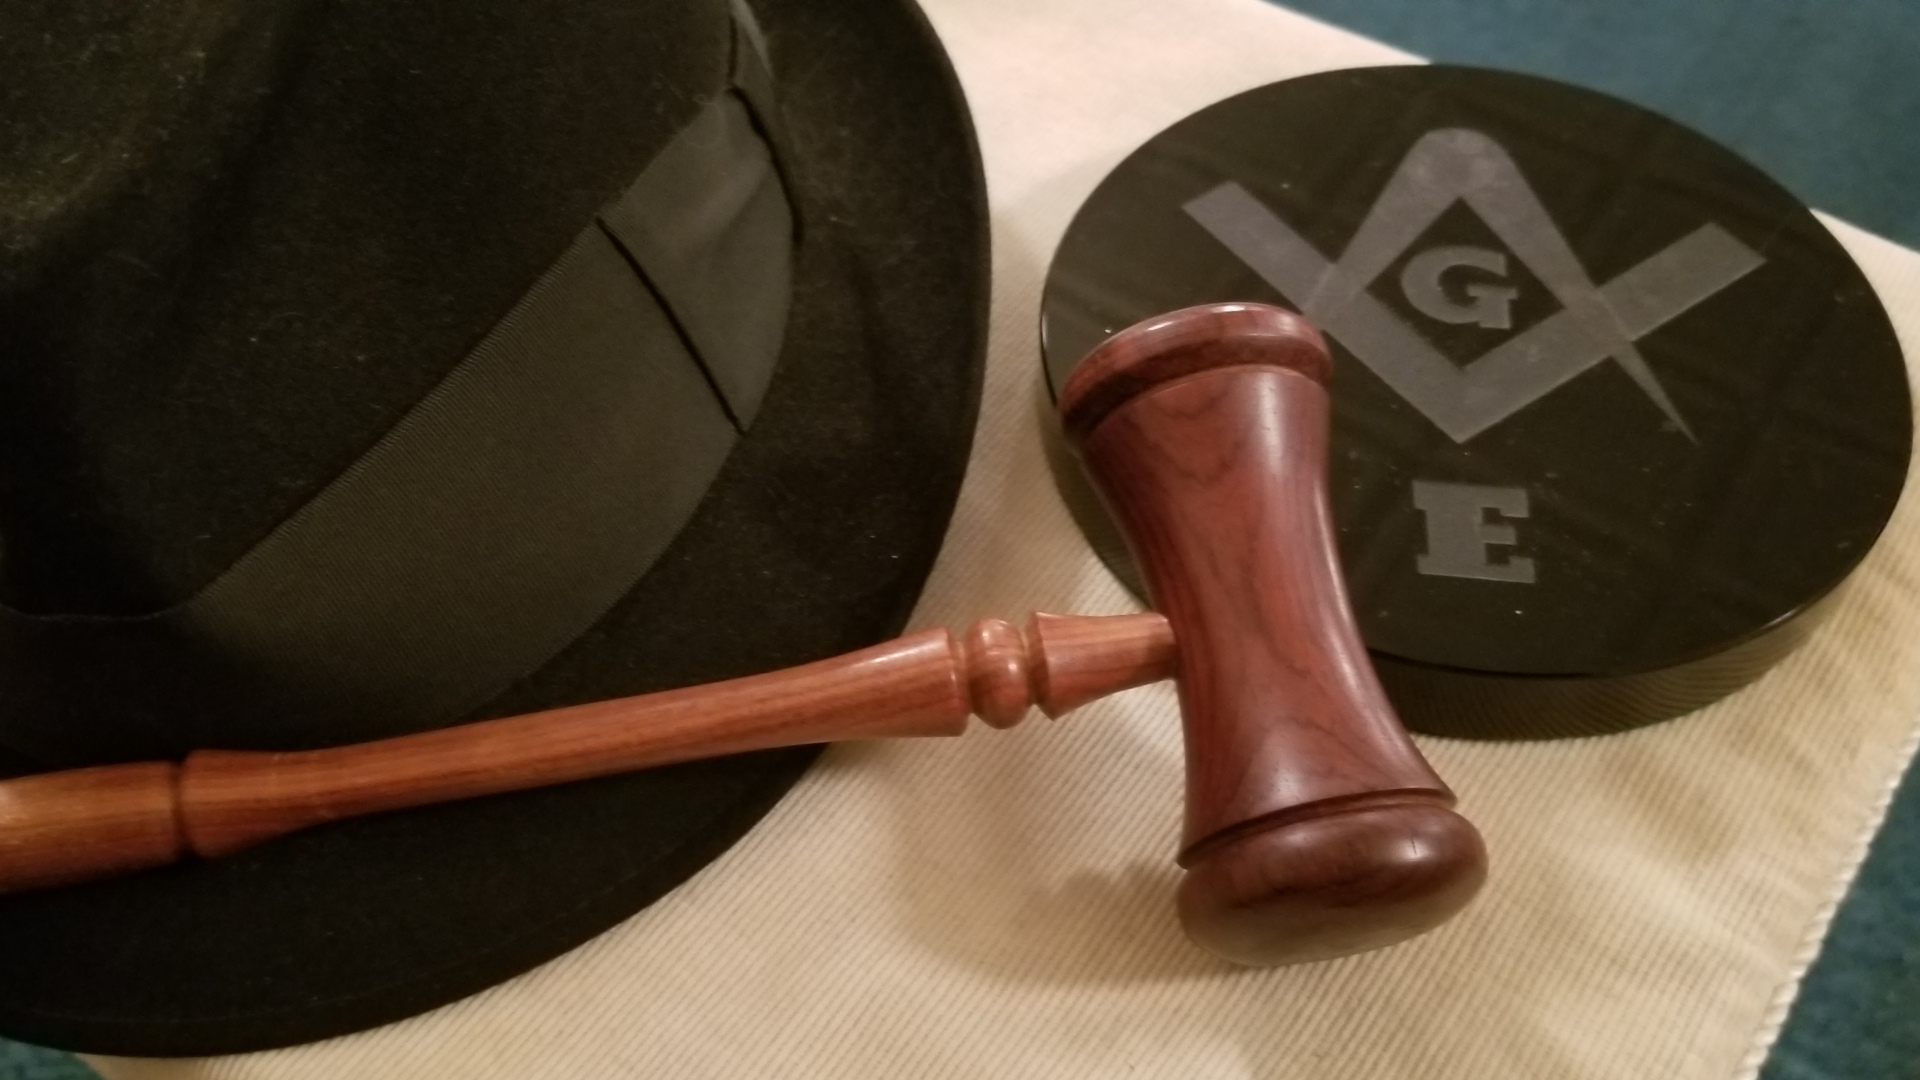
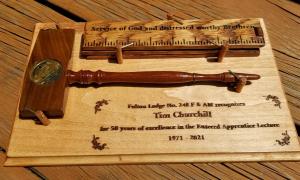 This is a Masonic plaque I crafted for a lodge brother of mine. He has been delivering the E.A. lecture for 50 years now and has demonstrated an amazing devotion to the fraternity. The E.A. lecture averages about 20 minutes of delivery from memory and is no small task for any mason to undertake. The plaque base is Aspen with leaser etched embellishments and a light coat of semi-gloss polyurethane. The twenty-four-inch gauge is oak and also has laser-etched embellishments for the 24 inches. The common gavel is Brazilian oak and has a masonic lodge coin embedded in the head. The pins are rotatable so the working tools can be removed and handled.
Tags
A Broken Column Masonic Woodworking Project
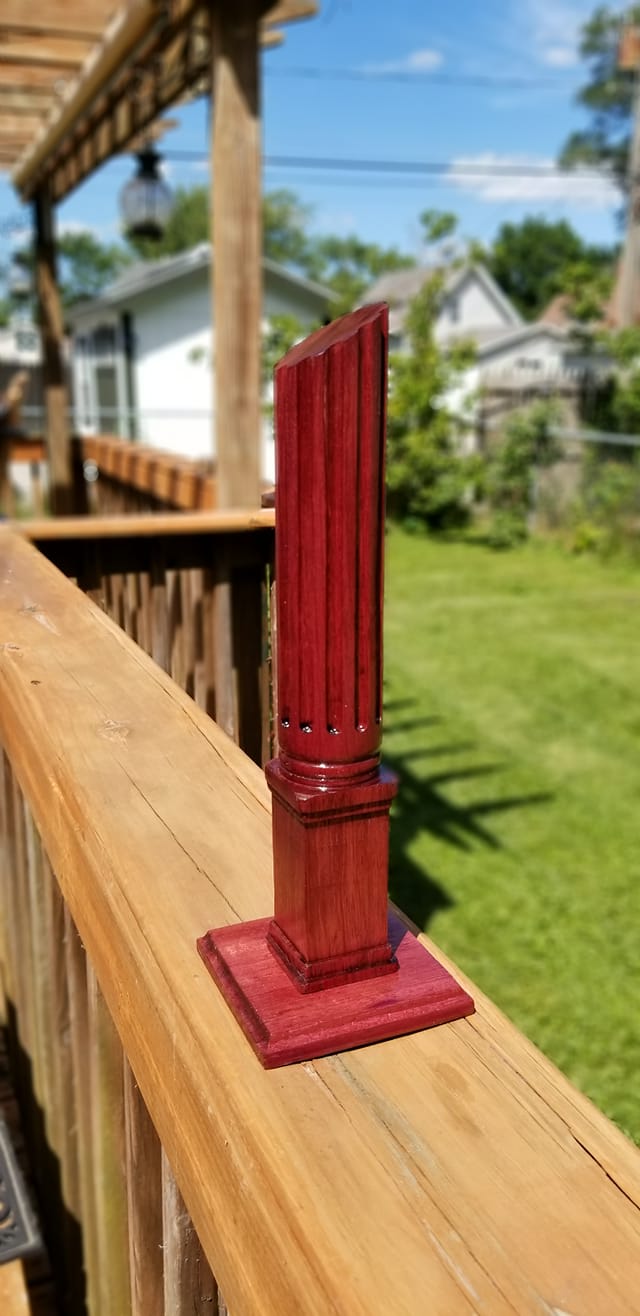 A friend asked for a small woodworking project, a broken column (it's a Masonic thing) which I thought I would take a crack at. This means I needed to learn how to do fluting on a spindle. The first challenge is that my LA200 lathe does not have an indexing lock. Thanks to the folks at Alisam Engineering for crafting a very well-engineered aluminum indexing plate and pin lock which fit my lathe beautifully. The next challenge was building a router jig or finding a ready-made one. Amazon and Penn State Industries to the rescue. I found a cool attachment with a trim router for less than $100 that seemed to rate pretty highly. I got everything in this week and took it for a test spin this afternoon. The wood is a very old chunk of oak I had pulled from a burn pile, so not the best quality, but I am happy with the end result, and my lathe got an upgrade. The last image is the final version and is purpleheart with a high gloss polyurethane coat.
Tags
The episode where Craig joins the local Grotto

Also sometimes seen as M.O.V.P.E.R., or, the Mystic Order of Veiled Prophets of the Enchanted Realm. Yes, I get it. It sounds somewhat contrived, but the goal is quite honorable in nature. Get Master Masons together for light-hearted frivolity and fellowship. It is a social club that does not claim to be masonic, but you need to be a Master Mason to join. As a bonus, you get a fez to wear to events.
What am I hoping to find with this latest adventure? I think the notion of fellowship with a large pool of masons, outside of the formal lodge setting, is what appeals to me most. I have found the organization to draw men of good character, and while we may not always see eye to eye on all topics, I have respect for their opinions and value their thoughts.
The ceremonial evening was amazing. The production was put on at the Maumee Indoor Theatre, followed by a wonderful dinner with time to converse. It drew in a crowd from all over the tristate area, and as far away as New York. My understanding is that the full production has not been performed in quite some time, so it sparked a lot of interest.
Tags
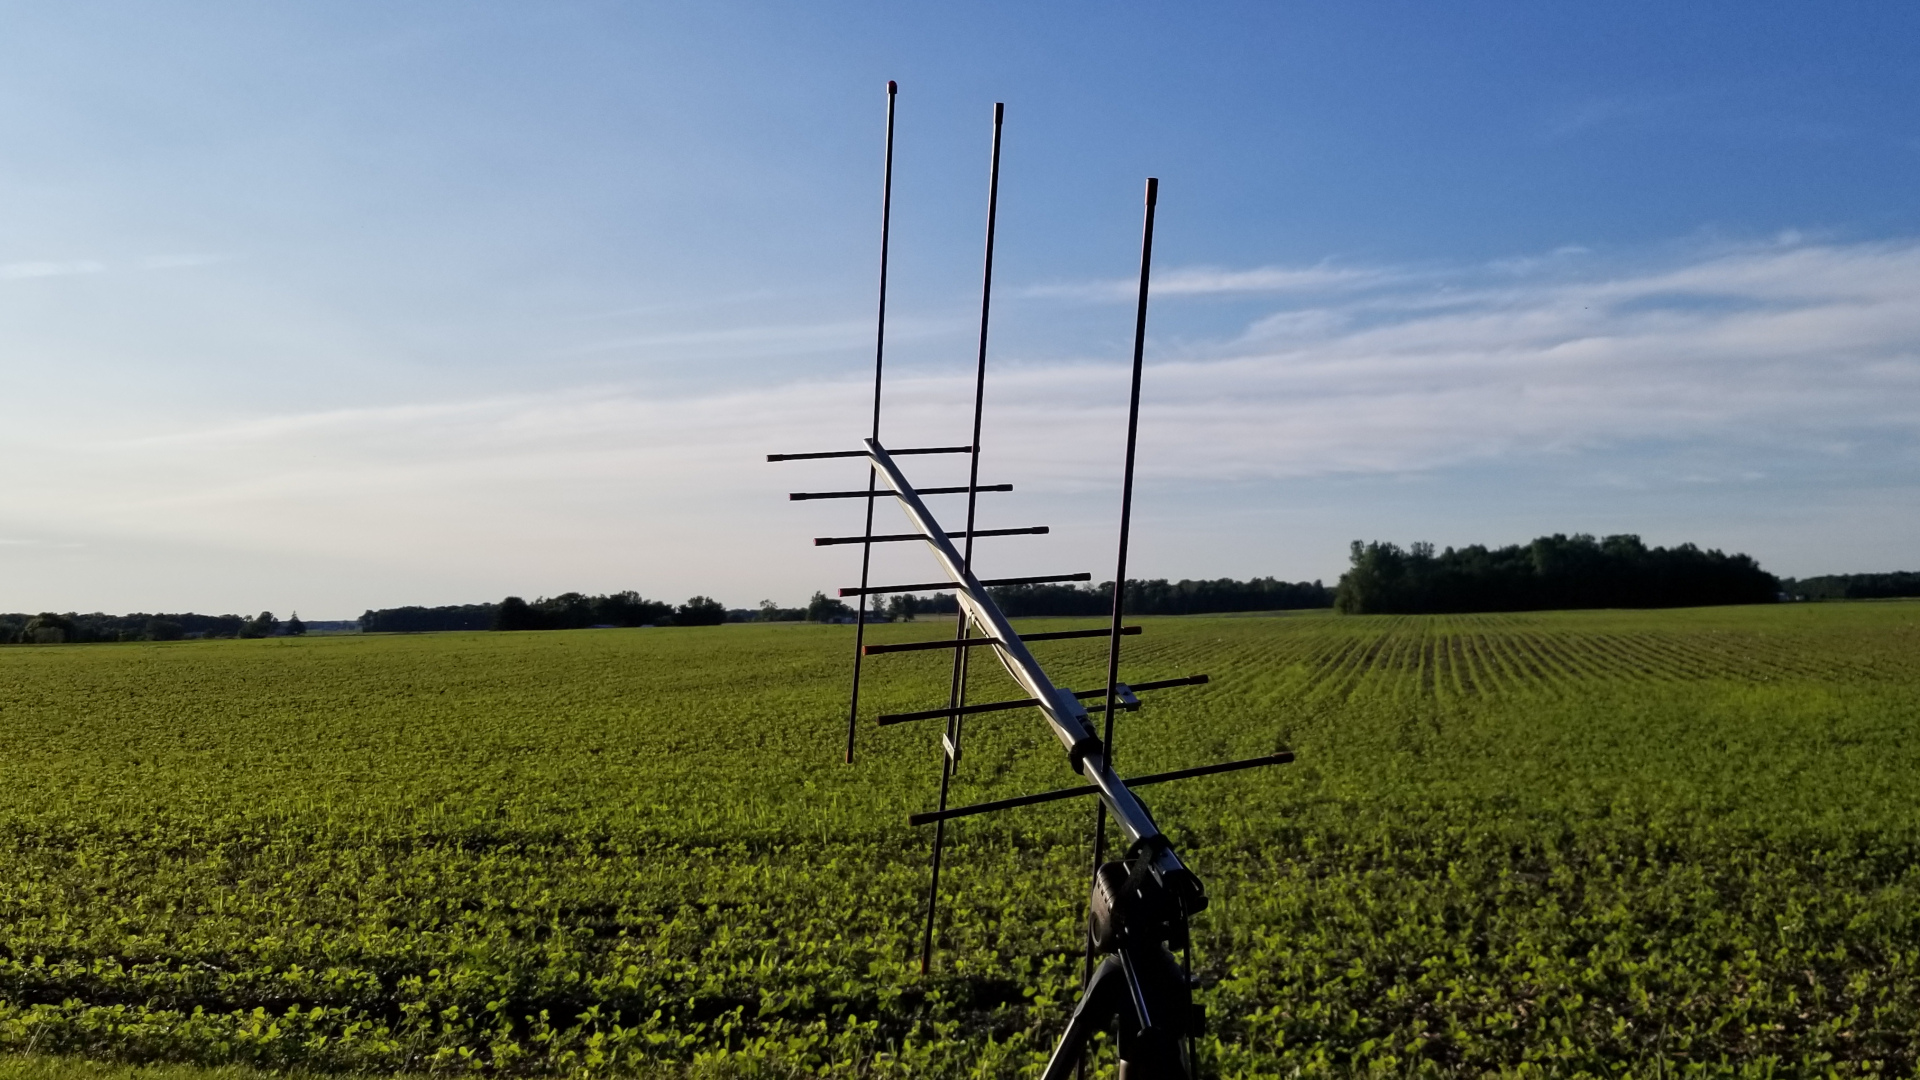
I finally got a Satellite QSO
Amateur Radio milestone this morning: my first satellite QSO! Bounced a signal off of AO-27 to grid EM55 (Tennessee, thanks WA4HFN) on a 5 watt handheld transmitter hitting an orbitting repeater the size of a shoebox at 1,700 miles out, in motion, with a 9 minute window.
Tags
Anniversary Gift for Jen
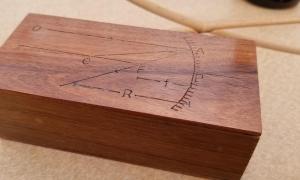 This is a small keepsake box for Jen for a simple anniversary gift. The visual equation on top is an inside joke we have shared for almost 30 years now relating to optics and our first year in Physics class at the University of Toledo. The wood is a Brazilian Walnut, exceptionally colorful and dense (just like me sometimes), and it contains some rough fire opals which is apparently a traditional 24-year gift. Not some of my finer work, but it came together in less than an hour.